Hey there, fellow tech enthusiasts and nostalgia lovers! You know, sometimes I feel like we’re constantly chasing the next big thing in the digital world, but lately, my passion has taken a wonderfully satisfying detour back to the past.
There’s this incredible joy that comes with finding an old, forgotten analog device – whether it’s a classic turntable, a vintage camera, or even an antique radio – and bringing it back to its former glory.
It’s not just about fixing wires or replacing parts; it’s about preserving a piece of history, understanding the craftsmanship of a bygone era, and rediscovering the unique, often warmer, character these devices offer compared to their modern counterparts.
Trust me, the satisfaction of hearing that first clear note from a restored amplifier or seeing a perfectly captured shot from a camera decades old is absolutely unmatched.
It’s a journey into sustainability, artistry, and pure analogue charm that I’ve personally found incredibly rewarding. If you’re ready to roll up your sleeves and give some forgotten tech a second life, you’re in the right place.
Let’s dig deeper into how you can start your own restoration adventure and uncover all the secrets to success!
Diving into Your First Analog Revival Project

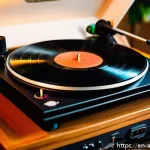
Okay, so you’re ready to get your hands dirty and bring some vintage magic back to life? That’s fantastic! I remember my very first project, a dusty old Garrard turntable I found at a flea market. It looked like it had been through a war, but there was something about its robust build and the promise of that warm vinyl sound that just spoke to me. The trick isn’t to start with something impossibly complex; you want a project that’s challenging enough to be rewarding but not so overwhelming that you lose steam. For me, the Garrard was perfect. It taught me the absolute basics of dismantling, cleaning, and understanding simple electronics without needing a degree in engineering. My biggest piece of advice here is to manage your expectations. You’re not aiming for perfection on your first go, you’re aiming for progress and learning. The journey itself, the process of bringing something from neglect back to a functioning, beautiful object, is truly the most satisfying part. Don’t be afraid to make mistakes; that’s how we learn, right? I’ve certainly made my share, and each one was a valuable lesson in patience and problem-solving. This isn’t just about fixing a device; it’s about building your confidence and rediscovering a tangible skill in our increasingly digital world. The sense of accomplishment when you hear that first crackle of life from a device you’ve personally resurrected is unparalleled.
Scouting for Your Perfect Starter Piece
Where do you even begin looking for these treasures? My favorite hunting grounds are local estate sales, thrift stores, and even online marketplaces like eBay or Facebook Marketplace. I’ve found some incredible gems tucked away in forgotten corners. When you’re looking, try to find something that’s relatively complete, even if it’s not working. Missing crucial parts can quickly turn a fun project into a frustrating scavenger hunt. Look for devices that have a good online community or readily available schematics – this is a huge help for beginners. Think simple: a vintage radio, a basic turntable, or perhaps an old lamp with interesting mechanics. Avoid anything that looks water-damaged or has extensive rust, as those can be really tough to salvage. Trust your gut; if a piece calls to you, even in its dilapidated state, it’s probably the one to bring home. Just remember, a good clean can work wonders, and sometimes, all a device needs is a little TLC to hum back to life.
Assessing the Initial Damage and Potential
Before you even think about plugging anything in, you need to play detective. What’s the general condition? Are there any obvious signs of damage like frayed wires, broken knobs, or corroded battery terminals? I always give things a good sniff too – sometimes a burning smell can indicate serious electrical issues. For turntables, check if the platter spins freely. For radios, see if the dials turn smoothly. Don’t be discouraged by dust and grime; that’s usually the easiest thing to tackle. What you’re really looking for are major structural problems or signs of deep electrical malfunction that might be beyond your current skill level or budget. A quick online search for common issues with that specific model can also give you a head start on what to expect. This initial assessment helps you set realistic goals and decide if a project is a go or a no-go for your current capabilities. It’s all part of the exciting challenge!
Essential Tools for Your Restoration Workbench
Once you’ve got your project piece, it’s time to equip your restoration station! You don’t need a massive, professional workshop right off the bat. Honestly, when I first started, my “workbench” was a corner of my kitchen table, and my tools were a hodgepodge of things I’d accumulated over the years. But there are a few absolute must-haves that will make your life infinitely easier and your restoration efforts far more successful. Think of it as investing in your new hobby. A good set of precision screwdrivers, a reliable multimeter for checking circuits, and some basic soldering gear will get you through most entry-level projects. Beyond that, having a proper cleaning kit – specialized electronic cleaners, brushes, and lint-free cloths – is crucial for making those components shine. I quickly learned that using the right tool for the job not only prevents damage to your vintage gear but also saves you a ton of frustration. There’s nothing worse than stripping a tiny screw head because you used the wrong screwdriver. It’s not just about having the tools, though; it’s about learning how to use them safely and effectively. YouTube tutorials became my best friend in those early days, showing me proper soldering techniques and how to safely discharge capacitors. Always remember, safety first! Unplug everything, and if you’re unsure, double-check. Getting zapped is not a fun part of the vintage experience, trust me on that one!
Must-Have Hand Tools for Disassembly
Your hands are your primary tools, but they need some assistance! A good set of Phillips and flat-head screwdrivers, especially in smaller sizes, is indispensable. You’ll also want some precision tweezers for those tiny components and small wire cutters/strippers. A spudger tool (often used for opening electronics like phones) can be surprisingly useful for prying open stubborn cases without leaving marks. Don’t forget a can of compressed air for blowing out dust from hard-to-reach places. I’ve found that having a magnetic mat or small compartmentalized tray to keep track of screws and small parts is a game-changer – it saves so much headache trying to remember where everything goes! These simple hand tools are the foundation of any successful restoration, allowing you to carefully and systematically take apart your device without causing further damage.
Cleaning and Rejuvenation Essentials
Cleaning isn’t just about aesthetics; it’s vital for proper function! Isopropyl alcohol (90% or higher) is your best friend for cleaning circuit boards, contacts, and old grime. Use cotton swabs and lint-free cloths for application. For external casings, a gentle all-purpose cleaner might be suitable, but always test it on an inconspicuous area first. DeoxIT D5 or similar contact cleaner is absolutely crucial for bringing scratchy potentiometers and intermittent switches back to life – I can’t stress this enough; it’s a miracle worker! For those really stubborn dirt accumulations, an ultrasonic cleaner can be a fantastic investment for smaller parts, but a gentle brush and a lot of patience usually do the trick. Remember, patience is key here; rushing the cleaning process can lead to damage. Take your time, and you’ll be amazed at the transformation.
| Tool Category | Essential Items | Why You Need It |
|---|---|---|
| Disassembly & Measurement | Precision Screwdriver Set, Multimeter, Pliers, Wire Strippers | For safe opening, electrical testing, and wire manipulation. |
| Cleaning & Preparation | Isopropyl Alcohol, Contact Cleaner (DeoxIT), Cotton Swabs, Lint-Free Cloths, Small Brushes, Compressed Air | Removes grime, oxidization, and improves electrical conductivity. |
| Soldering & Repair | Soldering Iron (adjustable temp), Solder (lead-free), Solder Wick/Pump, Helping Hands Magnifier | For re-attaching loose wires, replacing components, and detailed work. |
| Safety & Organization | Safety Glasses, Heat-Resistant Mat, Part Trays/Magnetic Mat | Protects you and keeps your workspace organized, preventing lost parts. |
Navigating the World of Replacement Parts
So, you’ve disassembled, cleaned, and now you’ve found a component that’s beyond repair. Don’t panic! Finding replacement parts for vintage analog gear can feel like a quest, but it’s often more straightforward than you’d think. I vividly recall needing a very specific output transformer for an old tube radio. My initial search felt like hitting brick walls, but by tapping into online forums and specialist websites, I eventually tracked one down. The key is knowing where to look and being patient. Often, the original manufacturer might be long gone, but compatible or “new old stock” (NOS) parts are frequently available from dedicated vintage electronics suppliers. Sometimes, you might even find parts harvested from other non-working units of the same model, which can be a real lifesaver. It’s also a fantastic way to understand the evolution of electronic components – seeing how certain capacitors or resistors have changed in size and material over the decades. Don’t be afraid to ask questions in online communities; the vintage tech restoration world is generally incredibly helpful and supportive. Someone out there has probably faced the exact same problem you’re encountering and can point you in the right direction. It’s all part of the detective work that makes this hobby so engaging and keeps your brain sharp!
Sourcing Authentic and Compatible Components
When it comes to sourcing, online communities and forums are your goldmine. Websites like Vintage Audio Forums, audiokarma.org, or specialized subreddits are packed with enthusiasts who trade parts and knowledge. For capacitors, resistors, and other common electronic components, you can often find modern equivalents that meet or even exceed the original specifications. However, for unique parts like specific vacuum tubes, styli for turntables, or certain integrated circuits, you’ll want to hunt for NOS (new old stock) or carefully pull them from donor units. Always double-check specifications and compatibility before buying. My personal rule of thumb: if it’s a critical component that affects sound quality or safety, invest in the best quality replacement you can find. For less critical parts, a good compatible component will usually do the trick. Don’t be afraid to experiment, but always prioritize safety and functionality.
Understanding Component Upgrades vs. Originality
This is where the debate often sparks among restorers: do you keep it 100% original, or do you upgrade certain components for better performance and longevity? For me, it depends on the device and its intended use. If it’s a museum piece, you might strive for absolute originality. However, for a device you plan to use regularly, upgrading certain capacitors to modern, higher-quality ones can significantly improve sound quality and extend the life of the unit. For instance, replacing old electrolytic capacitors is almost always a good idea, as they degrade over time and can cause buzzing or hum. It’s a balance between preserving history and enhancing functionality. Always research how upgrades might affect the device’s original character. Sometimes, a subtle upgrade makes a beloved piece of tech even better without sacrificing its vintage charm. It’s your device, so ultimately, the choice is yours, but it’s worth considering the pros and cons.
The Art of Soldering and Wiring Wisdom
If you’re going to dive deep into analog restoration, then soldering is a skill you absolutely, positively need to master. It might look intimidating at first, with the hot iron and the melting metal, but honestly, it’s incredibly satisfying once you get the hang of it. I remember my first attempts were… well, let’s just say a bit messy. Cold solder joints, too much solder, not enough solder – I’ve been there! But with practice, I started creating beautiful, shiny joints that were strong and conducted electricity perfectly. A good soldering iron with temperature control is paramount. You don’t want to scorch your delicate vintage circuit boards. Beyond just making connections, understanding proper wiring techniques is crucial for safety and optimal performance. Clean, well-routed wiring not only looks professional but also reduces the chance of interference or short circuits. It’s like plumbing for electronics, where every connection matters. This is where patience truly becomes a virtue. Rushing a solder joint or sloppy wiring can lead to hours of troubleshooting later on, and trust me, you want to avoid that headache! Invest in some good ventilation too; those fumes aren’t ideal for your lungs. With a bit of practice and attention to detail, you’ll be making flawless connections in no time, and that feeling of expertly joining two components is a little victory in itself.
Achieving Perfect Solder Joints
The secret to a good solder joint is all about heat, timing, and cleanliness. First, make sure both the component lead and the pad/wire you’re soldering to are clean and free of oxidation. Apply your heated soldering iron (around 350-400°C for most electronics) to both the lead and the pad simultaneously, allowing them to heat up for a couple of seconds. Then, touch your solder to the joint, not the iron. The heated components will melt the solder, allowing it to flow smoothly and encapsulate the connection. You’re looking for a shiny, concave “volcano” shape, not a dull, lumpy blob (that’s a cold joint!). Remove the solder, then the iron, and let it cool without moving. Practice on some scrap wires or old circuit boards until you feel confident. It’s a skill that definitely improves with repetition, so don’t be discouraged by your first few attempts. Good solder joints are the backbone of reliable electronics, especially in sensitive analog gear.
Wiring Best Practices and Safety

Beyond soldering, how you route and secure your wiring can make a huge difference. Always use the correct gauge wire for the current it will carry. For internal wiring, especially in tight spaces, try to keep wires organized and bundled with zip ties or heat shrink tubing. This not only looks tidier but also helps prevent accidental short circuits or wires getting caught in moving parts. When replacing old wiring, try to match the original layout as closely as possible, especially in audio circuits where wire routing can affect hum or noise. Always ensure your connections are mechanically sound before soldering – a good crimp or twist prevents strain on the solder joint. And critically, always unplug the device before working on any internal wiring, and be mindful of high-voltage capacitors that can hold a charge even when unplugged. Safety truly is paramount in this hobby; a moment of carelessness can have serious consequences. Take your time, double-check your work, and always prioritize your well-being.
The Delicate Art of Calibration and Tuning
You’ve fixed the faulty parts, cleaned everything to a sparkle, and soldered with precision. Now comes the moment of truth: calibration and tuning. This is where you truly bring your analog device back to its intended performance, and it often feels like coaxing a living thing back to health. I still remember the immense satisfaction of finally getting the tracking force and anti-skate just right on that old Garrard turntable – the difference in sound quality was night and day! It’s not just about turning knobs randomly; it’s about understanding the delicate interplay of mechanical and electrical components. For an amplifier, this might involve setting bias currents or adjusting DC offset. For a vintage radio, it could mean aligning the tuner circuit for optimal reception. This stage often requires patience and sometimes specialized tools like an oscilloscope or a frequency counter, but for many common devices, a good multimeter and your ears are enough. Don’t skip this step! A perfectly repaired device can still sound or perform poorly if it’s not properly calibrated. It’s the final polish that brings out the true character and potential of your restored analog gem. Embrace the fine-tuning process; it’s incredibly rewarding when everything finally clicks into place and performs beautifully.
Achieving Optimal Audio Fidelity
For audio equipment, calibration is key to getting that rich, warm sound we crave from vintage gear. For turntables, this involves precisely setting tracking force, anti-skate, and cartridge alignment. Small adjustments here can dramatically impact sound quality, reducing distortion and improving stereo separation. On amplifiers, you might need to adjust DC offset to minimize noise and ensure proper operation of output transistors, and set the bias current to optimize performance and prevent overheating. Using a multimeter for these electrical adjustments is usually sufficient. For tape decks, azimuth alignment is crucial for clear playback. Don’t be afraid to consult service manuals (often found online) for specific calibration procedures for your model. Your ears are also a fantastic tool here; listen for clarity, balanced soundstage, and lack of distortion. It’s a process of careful adjustments, listening, and readjusting until everything sounds just right – a true art form for any audiophile.
Aligning and Fine-Tuning Radio Circuits
Restoring a vintage radio often means diving into its RF (Radio Frequency) and IF (Intermediate Frequency) alignment. This is crucial for maximizing sensitivity and selectivity, ensuring your radio picks up stations clearly and without interference. While professional alignment often uses specialized test equipment like signal generators and oscilloscopes, for many basic AM/FM radios, you can achieve significant improvements with just a small screwdriver and a keen ear. Often, you’ll be adjusting tiny trimmer capacitors and inductor coils. The general idea is to tune to a known weak station and then carefully adjust these components, listening for the loudest and clearest signal. It’s a delicate dance, as one adjustment can affect another, requiring a bit of back-and-forth. Again, looking up service manuals for your specific radio model is incredibly helpful, as they usually detail the exact alignment points and procedures. The reward? Hearing those distant stations come in crystal clear on a radio that was once silent – a truly magical experience!
Personalizing Your Vintage Masterpiece
Okay, so you’ve resurrected a fantastic piece of analog history, and it’s working flawlessly. Now comes the truly fun part – making it uniquely yours! This isn’t just about restoring; it’s about personalization, about injecting a bit of your own style and personality into the device. I’ve seen restorers do everything from custom wood enclosures for amplifiers to unique paint jobs on vintage radios. For my Garrard turntable, I decided to build a custom plinth out of reclaimed oak, which not only looks stunning but also improved its acoustic isolation. It’s about taking something old and making it fit seamlessly into your modern space, or even giving it a completely new aesthetic twist. This is where your creativity can really shine. You could upgrade internal wiring with audiophile-grade cables, replace old knobs with custom-machined ones, or even integrate modern features like Bluetooth connectivity (carefully, of course, to maintain the analog soul!). The possibilities are endless, and it’s these personal touches that elevate a restored piece from merely functional to a cherished work of art. Imagine showing off a piece that not only works beautifully but also reflects your unique taste and craftsmanship. That’s the ultimate satisfaction, I think.
Aesthetic Upgrades and Custom Enclosures
Beyond the internal electronics, the exterior of your vintage device is begging for some attention. You can refinish wood cabinets, repaint metal chassis, or even replace old worn-out grilles. Custom enclosures are a fantastic way to give an amplifier or a radio a completely new look and often improve acoustics or heat dissipation. I’ve seen some truly stunning projects where people have integrated vintage gear into modern furniture or created entirely new, minimalist designs around classic components. Think about the materials – wood, metal, acrylic – and how they complement your home decor. New feet or isolation spikes can also make a surprising difference in both looks and performance for audio equipment. Even small details, like replacing worn lettering or adding a custom badge, can dramatically enhance the aesthetic appeal. This is your chance to really stamp your personal style onto your restored analog treasure, transforming it into a one-of-a-kind statement piece.
Integrating Modern Touches Thoughtfully
While we love the analog charm, sometimes a touch of modern convenience can be a welcome addition, as long as it’s done tastefully and doesn’t compromise the original character. For instance, adding a small, discreet Bluetooth receiver to a vintage amplifier allows you to stream music from your phone while still enjoying that warm, analog output. Or perhaps installing LED backlighting in a radio dial to enhance its evening glow. USB charging ports can be cleverly integrated into the back of a large vintage console. The key is subtlety and reversibility if possible. You don’t want to butcher the original design or functionality. Research carefully how to integrate these modern elements without creating electrical interference or compromising the device’s authenticity. The goal is to enhance the user experience, not to turn it into something it’s not. It’s about finding that sweet spot where vintage charm meets contemporary convenience, creating a truly unique and enjoyable device for years to come.
Wrapping Things Up
And there you have it, fellow enthusiasts! Embarking on your first analog revival project is truly an adventure. It’s not just about bringing a piece of technology back to life; it’s about connecting with history, learning invaluable skills, and experiencing the profound satisfaction that comes from creating something with your own hands. Don’t let the initial complexities deter you; every challenge is a step towards a deeper understanding and a more rewarding outcome. Trust me, the moment you hear that first perfect sound or see that old dial glow again, all the effort will feel incredibly worth it. Keep exploring, keep creating, and most importantly, enjoy the beautiful journey of analog restoration!
Good to Know Info
1. Always hunt down the original service manual for your specific device. They are treasure troves of information, containing schematics, calibration procedures, and part lists that will be your best friend throughout the restoration.
2. Online forums and communities are an absolute goldmine of collective wisdom. Don’t be shy about asking questions or sharing your progress; you’ll find an incredibly supportive network of fellow restorers eager to help.
3. Start small! Your first project doesn’t need to be a complex tube amplifier. A simple vintage radio or a basic turntable offers plenty of learning opportunities without overwhelming you.
4. Patience is more than a virtue in this hobby; it’s a critical tool. Rushing through steps, especially soldering or cleaning, can lead to costly mistakes. Take your time, enjoy the process, and step away if you feel frustrated.
5. Document everything! Take photos before disassembly, label wires, and keep track of screw locations. This will be an immense help when it comes time to reassemble your cherished analog piece.
Key Takeaways
Analog restoration is a rewarding journey of discovery, skill development, and personal expression. From scouting the perfect vintage piece and equipping your workbench with essential tools, to mastering the delicate art of soldering, navigating replacement parts, and fine-tuning for optimal performance, every step is an opportunity to learn and grow. Finally, personalizing your restored masterpiece allows you to infuse it with your own unique style, creating a truly one-of-a-kind treasure that bridges the past with your present.
Frequently Asked Questions (FAQ) 📖
Q: How do I even start if I’m totally new to restoring old analog devices?
A: This is such a fantastic question, and honestly, it’s where everyone begins! I remember feeling a bit overwhelmed at first, staring at a dusty old radio and wondering where to even put my hands.
My best advice? Start small and with something you genuinely love. Don’t jump straight into a complex tube amplifier.
Think about a simpler vintage turntable that just needs a new belt, or a classic camera with a sticky shutter. Personally, I swear by picking up a device that has a wealth of online resources – forums, YouTube tutorials, and even old service manuals are your best friends.
eBay, local flea markets, or even your grandparents’ attic are goldmines for these initial projects. Invest in some basic tools: a good set of screwdrivers, a multimeter for checking electrical currents, and some cleaning supplies.
And here’s a crucial tip I learned the hard way: always, always take photos before you disconnect anything! It’s like creating a breadcrumb trail back to sanity when you’re reassembling.
The joy isn’t just in the finished product; it’s in the learning curve and the detective work along the way.
Q: With all the modern tech around, why should I bother restoring these old analog gadgets? What’s the real appeal?
A: Oh, my friend, this is the heart of it all, isn’t it? I get this question so often, especially when I’m showing off a restored piece to someone who’s only ever known digital.
For me, it’s multi-layered. First, there’s the unparalleled sound or image quality. Think about the warm, rich tones of vinyl on a vintage stereo system compared to compressed digital files – it’s a tactile, immersive experience.
Or the unique character and depth you get from film photography that digital often struggles to replicate. But beyond the aesthetics, there’s a powerful sense of connection to history.
Each device tells a story of its era, its engineering, and the hands that crafted it. It’s also incredibly sustainable – we’re diverting e-waste from landfills and giving these beautiful machines a second life.
And on a personal level, there’s an immense satisfaction in bringing something broken back to life with your own hands. It’s a meditative process, a challenge, and a deeply rewarding act of creation.
Trust me, once you experience that first perfect note from a revived amplifier, you’ll understand completely. It’s truly magic.
Q: What are some of the biggest challenges or common pitfalls I should watch out for when I’m deep into a restoration project?
A: Ah, the battle scars of a restorer! Every single one of us has a story about a project that went sideways. The biggest challenge I consistently see, and have personally experienced, is patience – or rather, the lack of it.
Rushing things almost always leads to stripped screws, broken wires, or misdiagnosed issues. My personal mantra now is “slow and steady wins the race,” especially when dealing with delicate vintage components.
Another common pitfall is underestimating the cost and availability of replacement parts. Sometimes, finding that exact obscure capacitor or a specific lens element can feel like searching for a needle in a haystack, and the price can sometimes surprise you.
I’ve learned to factor in research time for parts and to be flexible with my budget. And here’s a big one: always assume there might be lingering electrical issues, especially with older tube-based electronics.
Safety first! Never work on plugged-in devices, and if you’re unsure about something, always consult an expert or a detailed schematic. You don’t want to turn your passion project into a shock hazard.
Learning from others’ mistakes (and mine!) is key to a smoother restoration journey.